This is what happens when the former manager of northern California’s largest public (because the government is always going to be bigger) paper filing system hits a budget vs. need conundrum: a do-it-yourself old school filing sorter.
For the directions, tools, etc. skip down to that section here: (Because I’m the first to tell you I hate it when there’s a backstory when all I want are the instructions, recipe, etc.).
We’re moving.
No big surprise there.
We’re sick of where we’re living, the politics, the heat, the inability to tackle real problems affecting our citizens and now there’s the added pressure of an additional twenty-thousand people displaced by California’s deadliest wildfire to date: The Camp Fire.
Let me share with you that if I could do it all over again, I’d force myself to spend whatever time necessary weekly to file. Now I’m faced with over fourteen years of neglected half-assed filing that’s accumulated, having to sort out tax information (and there’s a lot of it), needs and wants keepers when it comes to our kids (e.g. school work, report cards, letters of acceptance to college, etc.). And yes, all the edible (read pest attractants) have been removed from the mix. Eesh. The crazy thing about all of this is that I managed northern California’s largest hardcopy filing system. I should have been on top of this!
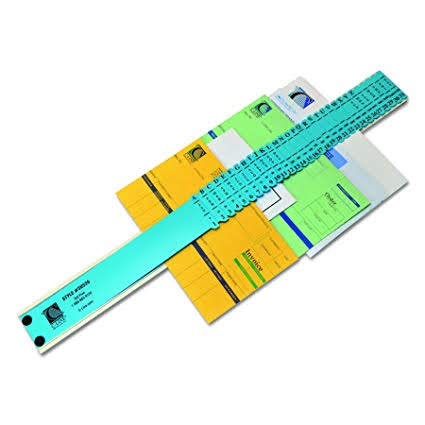
Taking the mounds of filing to task, I soon realized that the folding conference/ Thanksgiving overflow 8-foot table wasn’t big enough to properly sort out all of the papers. If only I had a file sorter. So I hopped online (which was a three-hour task seeing that Comcast a.k.a. Xfinity had downed my connection yet again) and looked to where I could find an inexpensive file sorter like the one pictured above.
Um. No. I was not going to spend $30-$40 for something that I’d probably only use once (because yes, now I’m committed to filing every damn week and that won’t take a file sorter). Not when we’re in the throes of the biggest move of our adult lives (I moved cross-country at a young age, but didn’t have the responsibility of the move like I do now). That $30-$40 is pretty much my budget for the week’s worth of food during the move. It’s that tight.
I looked online for some DIY ideas, but nothing came close to what I wanted, needed. They were all artsy-fartsy mail-room type sorters used for scrapbooking and the like. No, I needed precisely what I used to use back in the day in that huge filing room that took up half a mezzanine at the Fortune 500 company I used to work for.
And I did it!
Let’s get down to brass tacks, shall we?
- Priority Mail medium-sized recycled box
- Scotch tape
- Olives
- Post-it’s in long-small and long-medium sizes
- Washi tape
- Vermouth
- Gel pen, medium point
- Three recycled manila folders
- Scissors
- Cutting board
- Vodka
- Ruler (well, we’ll say I used that… )
Step One: Cut the flaps off the box and cut the main box down the side at the joint, lay it out flat.
 Priority Mail Medium Flat Rate Recycled Box |
 Cut off all flaps |
 Cut joint, lay flat |
Step Two: Cut 1″ strips from side to side of standard manila folders for a total of 38 strips (approximately 2 1/2 folders with tabs cut off). That provides a strip for each letter of the alphabet plus the twelve months. I used the cutting board for uniform thickness and straight lines. You might find it works just as well to use a ruler and pencil your cutting lines and cut with a pair of scissors.
 Plain manila folder (trim the tabs) |
 I used a cutter that allowed me to line up nicely |
 Perfect strips! |
 Strips are done, moving on |
Step Three: Using the vodka, a breath of vermouth, make a martini and add an olive or two.
Step Four: Attach the manila folder strips using enough tape to properly secure the strip to the horizontal center of the box starting from the left (or for left-handers, right side) of the box, which we’ll now call board.
 Would’ve been nice if I saw this line from the beginning |
 Tape, fold back to edge of tape for each strip |
 Width of tape = folding line |
 Ack, cheap tape = boo-boos |
 See? Nice and even! |
 Start right at the very edge |
 Oh, whoops! |
 Straight now by rebending |
 Done. The last strip reaches just beyond the end, which is fine (by me!) |
Tips: I found that there’s a line of print that goes smack down the middle of the board. Of course, I figured that out by about the letter F (as in figures, you dirty-minded fools), which seemed to be an on-going theme throughout this project. Also, by using the width of the tape, then folding the strip back to the edge of the tape gave perfect, uniform separation as I worked down the line. I highly recommend using quality clear tape, not that stuff you find at the Dollar Store, because that pops up and off in no time flat and is a real bear.
Step Five: Once all the strips are taped, then it comes time to label the strips. With the professional sorter, these are labeled with so many different options: numerical, alphabetical, months, days of the month. For my purposes, I simply needed the alphabet and months. Using Post-It® notes in two different sizes and multiple colors, I began labeling. I used Washi Tape to secure the label because it’s not just decorative, it keeps the label in place and it’s easy to remove should I opt to go with a different labeling system if this one doesn’t quite work out.
 Washi Tape (top left), Post-It® notes (bottom left)
|
 Finally getting the hang of it. Bend first, write, then attach |
 My measurements for Washi |
 Thankfully I’m not OCD about this |
 Doesn’t need to meet on the backside |
 Tada! |
 Back of Letter “F” |
 Perfection (finally!) |
 Three martinis later . . . A-Z + Jan – Dec DONE! |
 Not too shabby and ready for sorting now |
Tips: I found that bending the Post-It® note in half allowed me to write the label at the correct distance so that it showed when the strips were in their resting position, there was enough of the label to go on either side of the strip, and the decorative Washi Tape could run evenly under the label. For measurement, again around the letter F, I got the hang of measuring between my middle and ring finger with a slight space between. Also, by about now, pour yourself another martini because this was the most time-consuming and rigorous part of the project.
Did it work? Damn skippy! I’ll post to my Instagram when I’m done with the first box of sorting to be completed. I did have one of the strips detach, which was probably due to that cheap tape I used part-way through. I also had to be delicate in lifting tabs once I added enough heft to the sorting, but it didn’t slow me down much.
Post your own projects! I’d love to see if this works for other people, too. Questions? Ask away. I could always use a break from packing (and a martini, too!).

You must be logged in to post a comment.